DATEV Guide
Introduction
With the DATEV interface from efsta you can automatically convert transaction data from your online cash registers into DATEV posting data, which is done via the interface "Rechnungsdatenservice 1.0" provided by DATEV. On efsta side, the archive feature is mandatory for this, and the same applies to the online cash ledger on DATEV side, as the booking data is stored directly in it.
The automatic transfer runs daily at 03:00 CET.
Registering the efsta DATEV-Interface
Step 1: Portal
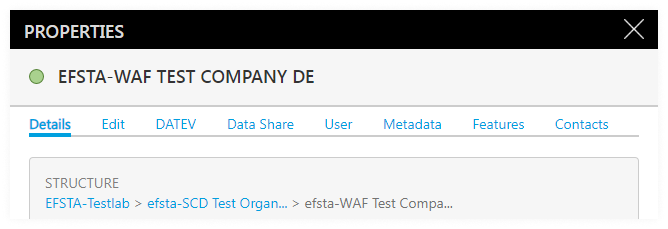
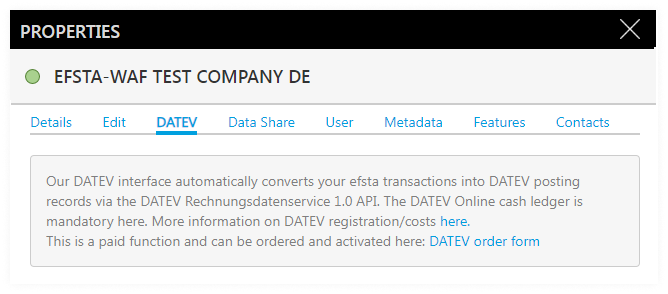
To use the DATEV interface from efsta, you first have to go to the company's settings in the efsta Portal and click the tab "DATEV".
This option is only available to german companies.
Step 2: Ordering & Activation
At the DATEV tab you will find the previously mentioned information about functions provided by the efsta DATEV interface. It is also strongly advised that you inquire about the DATEV Rechnungsdatenservice 1.0 interface once more before ordering, as additional costs may accrue from DATEV and you will have to register with DATEV as well. More information on the DATEV interface can be found here: DATEV Rechnungsdatenservice 1.0
Once you are ready, you can use the order form to obtain a binding activation for the efsta DATEV interface. Once the form has been successfully submitted, the DATEV feature will be activated for your company. This activation process may take a few days.
Details about the costs can be found in the order form, or by getting in touch with your partner manager.
After activation, the view in the Portal changes and you will be able to see the current status of your connection to DATEV, which is displayed with one of the following two colors:
Red – No connection
Green – Connection successful
At this point we would like to emphasize once more to inform yourself about the necessary requirements on the DATEV website and implement these before logging in.
In order to receive the booking data correctly, a DATEV cash ledger must be created for each of your registers in efsta. The name of each cash ledger is made up of with the specified TL and TT in the format '[TL]/[TT]'. For example, for a register with TL = '1' and TT = '001', a cash ledger with the name '1/001' has to be created.
Step 3: Login
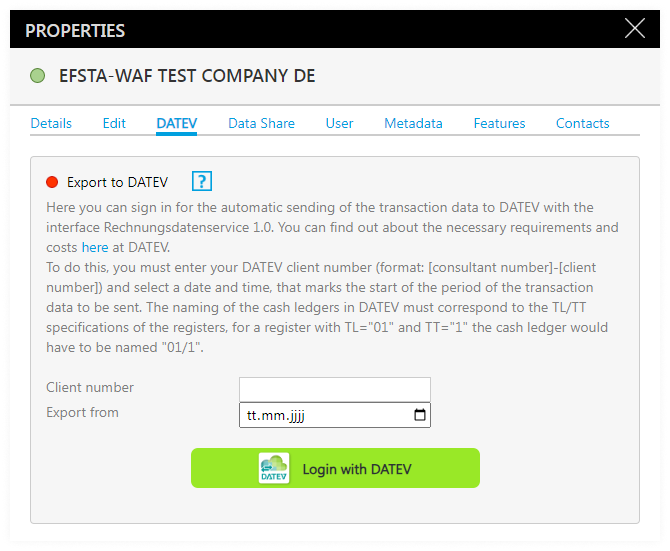
If everything before has been taken into account, you can now log in by entering your DATEV tenant number, which is made of of the DATEV consultant number and client number, separated by a hyphen ('-').
Next, a date must be entered in the 'Export from' field. This date does not reflect when the sending process should start, but rather the beginning of the period from which the data should be transmitted. For example, if "01.01.2024" is entered, all data created from 01.01.2024 and onwards would be sent.
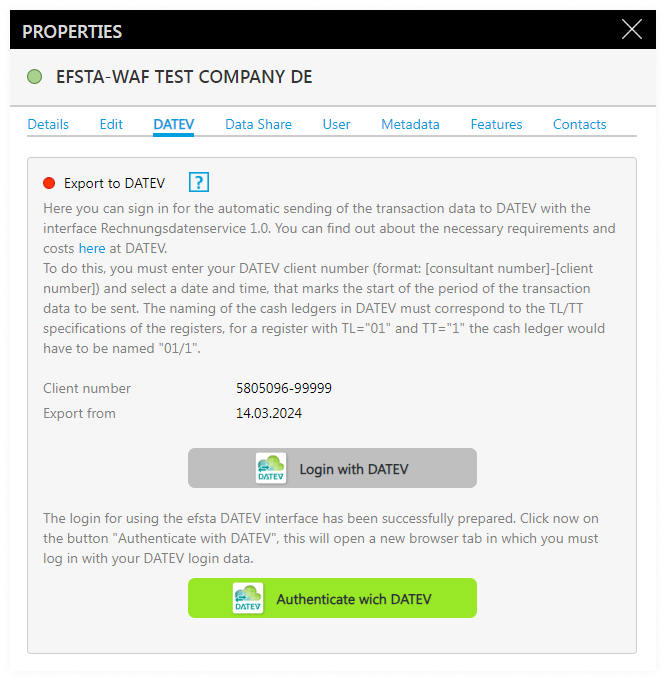
Once all the necessary information has been entered, please click on 'Login with DATEV'. This will prepare the login process and an additional button "Authenticate with DATEV" will appear on the interface.
Step 4: Authentication
Next, please proceed by clicking on the "Authenticate with DATEV" button. A browser window will open in which you must log in with your DATEV login data. Upon success, a dialog will open in which you can see which authorizations efsta requires for the automated sending of transactions. These must be confirmed in order to continue.
Step 5: Finalization
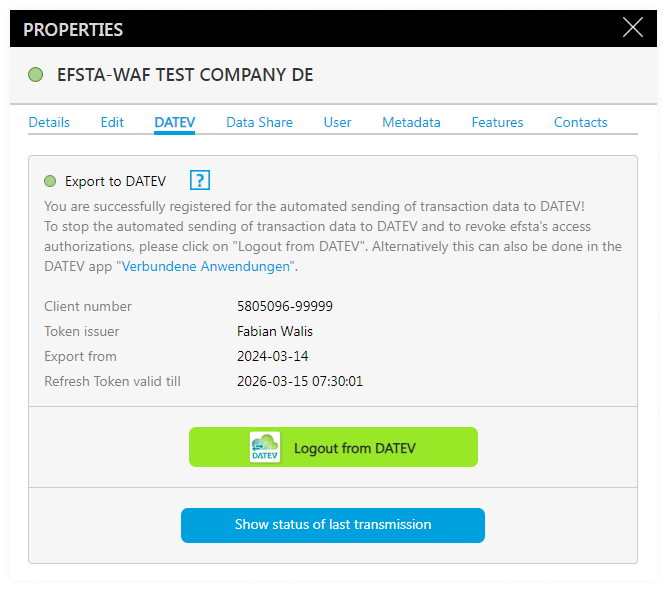
You will then be prompted to return to the efsta portal. After a few seconds, the window will be refreshed on its own. If you have followed the previous steps correctly, you are now registered for automatic transfer of transaction data to DATEV. The status icon in the Portal changes to green, showing the connection was successfully established.
Furthermore, it also reveals who accepted the authorization requests on the DATEV side and how long the token we require for upcoming transfers is valid.
Unsubscribing from Automatic Transmission
You can opt out of the automatic transfer at any time by clicking on 'Logout from DATEV'. This will end the daily transfer, but the service fee from efsta will still occur until the clearance for the feature has been revoked. To initiate this, please contact your partner manager.
Checking Transmission States
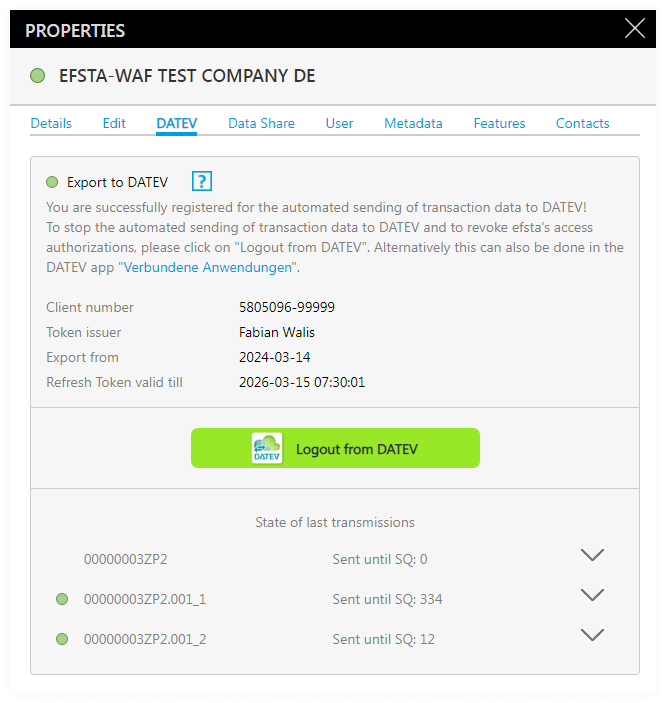
Below this is a button "Show status of last transmissions". Here you can see the current state for each active POS system in your company and either a green or red status icon which indicates whether the transmission was successful, as well as the number of the respective register and the last sequel number up to which a data transfer was carried out.
Clicking on a register number also opens up a detailed log of the last transmission. If a status is marked with a red icon, that means that the transmission has an error. In this case, please contact efsta support at ticket@efsta.eu.
